If you’ve played even a handful of Valorant matches, you know Haven isn’t your typical map. It was the first Valorant map to be released with three sites, which instantly became a fan favourite map. Even though it was a fan favourite, Haven still became one of the toughest maps to get through and win, especially on the attacking side.
To win, the players had to have good knowledge of map hideouts, clear communication with map callouts, and good strategies they could fall back on with various agents suitable for the Haven map. If you are new to the game or have been playing for years, this guide will help you get a more than 65% win rate in Haven.
Haven Map Overview
Haven is one of the first four maps to be released with the Valorant beta phase back in 2020. This Bhutan monastery-inspired map was the first competitive pool map to be released with three site designs.
This setup means defenders have to stretch thin, attackers can get creative with splits and fakes, and map control is more important than in any other map. It’s fast-paced, rewards creative teamwork, and always keeps you guessing on the defence, yet it is still today’s fan favourite map in Valorant.
Haven map is available on the competitive, unranked, spike rush, deathmatch, and other rotation modes, except in the team deathmatch mode. It’s one of the unique maps in Valorant with fewer updates made after the initial release in 2020.
What makes Haven unique?
Haven stands out in Valorant’s map pool with its three-site design, creating strategic complexity that rewards tactical thinking over mechanical skill. Mid strategies can turn the tide of the game, enabling teams to quickly shift strategies or execute powerful splits.
When moving between sites, Haven’s paths through Garage and Links test your split-second decision-making. The vertical elements-with Heaven overlooking A site and high grounds in the A site and off angles you can play can instantly change the outcome of the match in split seconds.
- Three bomb sites: More options for attackers, more pressure on defenders.
- Mid: The beating heart of the map, connecting all three sites.
- Multiple rotation routes: Garage, Links, and Spawn paths make for fast rotates.
- Verticality: Heaven and Hell on A, plus elevated windows and platforms, create tons of angles.
Map Updates
Riot Games has released a couple of noticeable updates to Haven map after the initial release in 2020 during the Valorant Beta Phase. The map was also taken out of the map pool to make necessary changes a few times.
Is Haven Still in the Map Pool?
Haven is still on the competitive map pool as we checked on 2025 May 25th but it can be rotated out in the incoming act update. It’s a known fact that most maps in Valorant get rotated out during Episode changes or Act changes for updates and reworks which help to keep the game more competitive.
Haven Map Changes
A few changes have been made to the Haven map from 2020 until 2025 which has significantly improved the gameplay in Valorant, especially in the competitive game mode. Here’s a summarized version of the Haven updates up until now.
| Date | Patch | Key Changes | Impact |
|---|---|---|---|
| April 2020 | Beta Launch | The original three-site design was introduced | Competitive Map Pool Released |
| August 2020 | 1.07 | Lighting improvements, pixel-walk fixes | Better visibility on A Heaven/C Long |
| March 2021 | 2.06 | Enhanced utility placement options | Improved Cypher/Killjoy viability |
| December 2022 | 5.12 | Removed from competitive | Map health concerns cited |
| June 2024 | 8.11 | Returned to competitive rotation | Community demand satisfied |
| June 2024 | Console Beta | Added to console launch maps | Expanded platform availability |
| September 2024 | 9.06 | Vyse utility fixes, Cypher improvements | Better agent interaction quality |
Map Callouts
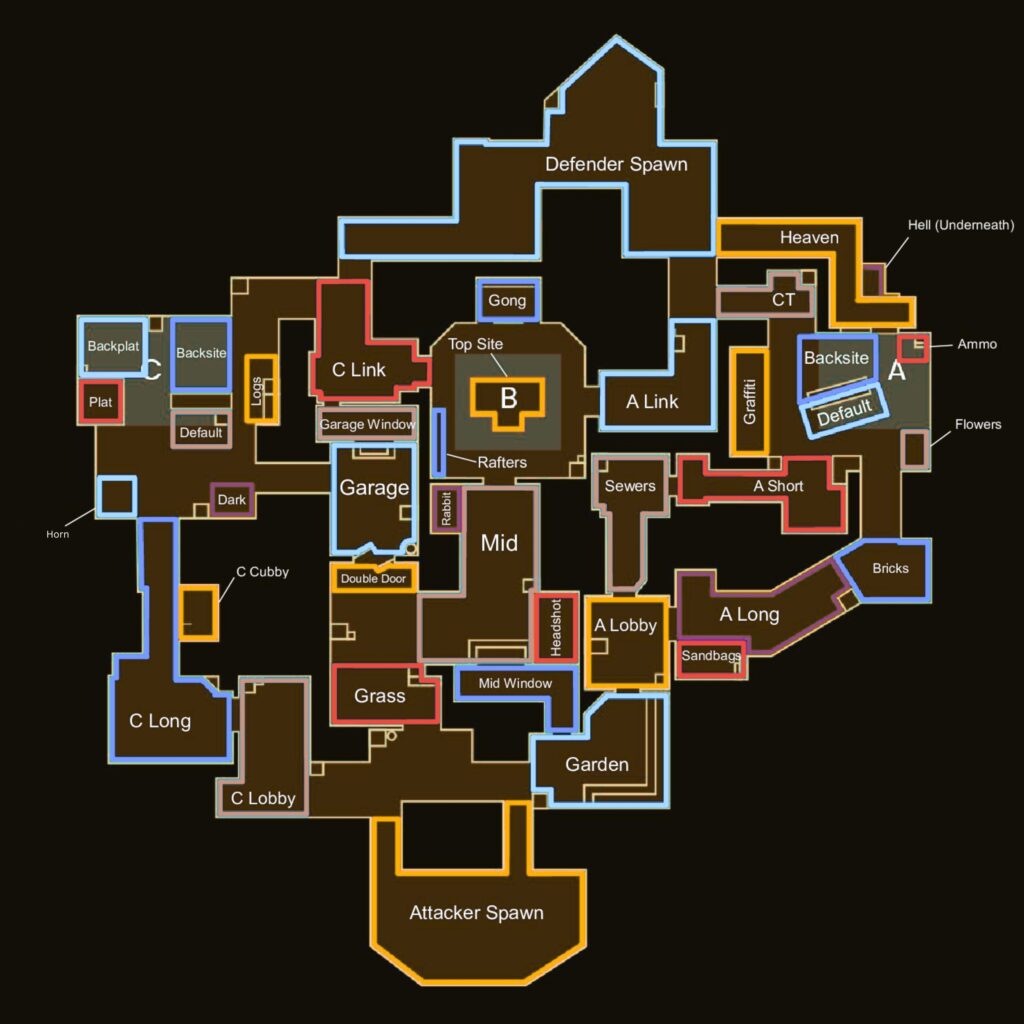
Communication is gold when it comes to dominating in Valorant. But to communicate well, you have to know what the symbols and places in that map are called. All of the Map callouts in the Haven map are given in the Map figure below, with the most used ones.
- A Long: The long corridor leading to A, perfect for Operator duels.
- A Short (Sewer): A tighter path to A, usually smoked or flashed during executes.
- A Heaven: The raised platform above A, giving defenders a powerful sightline.
- A Hell: The space directly under Heaven- always check this for sneaky defenders.
- B Site: Central and compact, with B Window (Mid) offering a high ground peek.
- Garage: Connects Mid to C, a crucial control point for both sides.
- C Long: The longest sightline in the game-great for snipers and long-range fights.
- C Platform/Back Site: The far end of C, where defenders often anchor.
- C Cubby: A tight angle on C Long, perfect for ambushes.
- Mid Window: Overlooks Mid Courtyard, giving defenders early info and control.
While these are the most used callouts in Haven, they are not all the callouts. As seen in the image here is the full Haven callout list if you want to be extra familiar with the map and have the best communication, which will contribute towardsa higher win percentage on Haven.
| Callout Name | Site/Area | Description |
|---|---|---|
| A Lobby | A Site | Initial zone for attackers before advancing to A Long or A Short. |
| A Long | A Site | Long corridor leading to A Site, often used for long-range engagements. |
| A Short | A Site | Pathway leading directly to A Site, or a “short way” to A Site; connects A Lobby with the site. Also referred to as “A Sewers.” |
| A Site | A Site | Main area for spike installation at point A. |
| A Tower (Heaven) | A Site | High position near A Site, providing additional visibility and control over approaches to the point. |
| A Link | A Site / Mid | Passage connecting A Short with Mid Courtyard, or A Site to B Site. |
| A Cubby | A Site | Small niche next to A Site for hiding, or a cubby outside A Short. |
| Hell (Underneath) | A Site | Attacker’s common location underneath A site. |
| Double | A Site | Corridor connecting A Lobby to A Short, an alternative route for attackers. |
| Garden/Grass | A Site | Area leading to A Site from Mid and Attackers’ Side Spawn. |
| Ramp | A Site | Short ramp connecting A Long to A Site. |
| Tunnels | A Site | Three boxes are stacked along the wall. |
| Yellow | A Site | Small yellow corridor leading to A Link from A Site. |
| B Site | B Site | Central point for spike installation, located in the middle of the map. |
| B Back | B Site | Rear end of B Site, providing additional cover and control from different angles. |
| Mid Courtyard | B Site / Mid | Open area leading directly to B Site. |
| Mid Window | B Site / Mid | Window facing Mid Courtyard, providing information on Site B. |
| B Main | B Site | Main passage leading to B Site. |
| B Upper | B Site | High point near B Site, controlling the entrance. |
| B Pillars | B Site | Area with pillars next to B, providing cover. |
| B Waterfall | B Site | Area in front of point B for covert approach. |
| Boost | B Site | Large structure in the middle of the B Site, providing cover and elevation. |
| Tetris | B Site | Long corridor stretching towards the C Site. |
| C Lobby | C Site | Initial zone for attackers before entering C Long. |
| C Long | C Site | Shorter way to the C Site, providing a different angle of attack. |
| C Short | C Site | Small corner near the C Site for hiding. |
| C Site | C Site | Area for placing a spike at point C. |
| C Cubby | C Site | Window allowing a view of C Site from a safe position. |
| C Window | C Site | Window allowing view of C Site from a safe position. |
| C Link | C Site / Mid | Passage connecting C Site with Mid Courtyard. |
| C Platform | C Site | Spot on C Site for holding angles. |
| C Logs | C Site | Spot on C Site for holding angles. |
| Mid Courtyard | Mid | Open area in the center, allowing quick movement between A, B, and C. |
| Mid Doors | Mid | Doors located in the center leading to C Short. |
| Mid Window | Mid | Window providing an overview of the center. |
| Mid Bottom | Mid | Lower part of the central zone. |
| Mid Top | Mid | Upper part of the central zone. |
| Mid Mail | Mid | Small room in the center, used to control mid and connect to B. |
| Garage | Mid | Area connecting mid to C Site, often contested for mid control, and a rotational point between C and B sites. |
Site Layouts
Understanding the site layouts is just as important as map callouts because when you’re attacking, you need to expect the places that enemies could hide out in. Expecting them and clearing corners will prevent unnecessary damage to you and your teammates. With that said, let’s find out what you need to pay attention to on Sites A, B, and C on Haven.
Site A Layout
Site A is the most complex of Haven’s three sites, offering multiple entry points and vertical combat. Attackers can approach from A Long (a sniper’s nest) or A Short/Sewer (a tighter, riskier path and prone to getting hit by shotguns and SMGs).
Defenders typically post up in A Heaven, using the high ground to watch both entries and the plant zone. The Hell area under Heaven and the truck is a classic hiding spot for split-second aces.
- A Long encourages long-range duels and Operator play.
- A Heaven gives defenders a massive advantage, but it’s also a magnet for utility-expect smokes, flashes, and Sova darts. Haven is vulnerable to wallbangs.
- A Short allows for quick splits and pinches, especially if attackers coordinate utility.
- A Link connects A to B, making for fast defender rotations or quick attacker pivots.
Site B Layout
B Site is the beating heart of Haven, sitting smack in the middle of the map. It’s small, cramped, and only has one main entrance: B Main (from Mid). What makes B tricky is how quickly defenders can rotate from A or C via A Link and C Link. Mid Window overlooks B, letting defenders peek or contest the plant. Because of its size, post-plant situations on B are always hectic- don’t expect to hold the site for long without backup.
- B Entrance: Makes direct rushes risky but rewarding if you catch defenders off guard from A-link and C-link.
- Quick rotations: Defenders can collapse on B in seconds if you are quick, so speed and utility are your best friends.
- High Ground: Watch for defenders peeking or dropping utility from the garage window or on top of the boxes in B site.
- Tight corners: Clear every angle is full of sneaky spots for shotguns and SMGs, especially pay attention if a Sage is there.
Site C Layout
C Site is all about range and timing. Attackers can push from C Long (the longest sightline in Valorant) or through Garage, which connects Mid to C via a destructible door. Defenders usually anchor from the C Platform/Back Site or hold aggressive angles on the C Long. Garage control is often the difference between a successful C take and a failed push-if attackers get Garage, they can pinch the site and overwhelm defenders.
- C Long: Snipers everywhere; great for Jett or Chamber.
- Garage: Opens up split pushes and fakes; don’t ignore it or you’ll get hit.
- C Platform/Back Site: Strong anchor positions for defenders and a perfect hideout.
- C Cubby: Easy to overlook, but a favorite for cheeky plays.
- CT Spawn: The main rotation path for defenders.
Best Agents for Haven
According to the agent tier list 2025, Jett, Reyna, Raze, Sova, Skye, Breach, Clove, Omen, Sage, Killjoy, Cypher, and Chamber have the highest pick rates for the Haven map in Valorant. Based on this, you can pick the agents to draft a good strategy to win the most rounds in the Haven map.
Controllers
Omen: Multiple smokes for covering Haven’s many angles, plus teleport for creative plays.
Clove: If two controller setup is picked, then have Clove play with the Omen to even more confuse the enemies.
Astra: Can cover most ground and have good utility usage, which is perfect for the Haven in Valorant, especially while defending the spike on attack.
Duelists
Jett: Mobility to peek and escape on long sightlines (A Long, C Long), and excels with the Operator.
Phoenix: Great for beginners- flashes, healing, and info-gathering make them versatile picks.
Sentinels
Killjoy: Her turret and Alarmbot cover multiple sites, and her ultimate is perfect for retakes or post-plants.
Cypher: Tripwires and cameras help watch flanks and the Garage, locking down key choke points.
Initiators
Sova: Recon Bolt and drone gather info across wide areas, ideal for clearing A or C.
Breach: Flashes and Aftershock are perfect for clearing tight corners and enabling fast site takes.
While the above are the best agent choices for the Haven map, you can play your favorite agents as well if you use the utilities well enough you can pull off more rounds in your favor.
| Agent | Role | Key Abilities | Why Effective on Haven |
|---|---|---|---|
| Omen | Controller | Dark Cover, Shrouded Step, Paranoia | Regenerating smokes and teleports for flexible site control and aggressive plays on a three-site map; active playstyle dominates. |
| Astra | Controller | Nebula/Dissipate, Gravity Well, Cosmic Divide | Smokes cover multiple angles for entries/retakes; utilities for common enemy angles; ultimate perfect for committing to or retaking sites. |
| Clove | Controller | Meddle, Pick-Me-Up, Not Dead Yet | Can deploy smokes even after death, ensuring continuous utility on a large map; aggressive and defensive capabilities. |
| Jett | Duelist | Tailwind, Cloudburst, Blade Storm | Excellent mobility for early picks, quick rotations, and escaping danger; smokes provide quick cover; ultimate offers economic benefits. |
| Raze | Duelist | Paint Shells, Boom Bot, Blast Pack | Smokes cover multiple angles for entries/retakes; utilities for common enemy angles; ultimate, perfect for committing to or retaking sites. |
| Neon | Duelist | Highgear, Fast Lane, Relay Bolt | Fast sprint for rapid rotations across three sites; creates clear entry paths; stuns opponents for easier engagements. |
| ISO | Duelist | Double Tap | Provides a shield against damage, highly effective against Operator users, strong kill-making potential after patch 8.11. |
| Sova | Initiator | Recon Bolt, Owl Drone, Hunter’s Fury | Top-tier information gathering for all three sites; high long-distance damage; effective on a map with few high obstacles. |
| Breach | Initiator | Flashpoint, Fault Line, Aftershock | Powerful flashes and stuns for pushing out opponents and critical for entries; ultimate secures rounds on small sites. |
| Skye | Initiator | Guiding Light, Trailblazer, Seekers | Flashes effective in narrow openings; scouting ability for attacks; ultimate provides crucial enemy locations; can heal teammates. |
| KAY/O | Initiator | ZERO/point, FRAG/ment, FLASH/drive | Suppresses enemies and provides accurate information; lineups for obstructing points or denying defuses; ultimate provides combat stim and re-stabilization. |
| Killjoy | Sentinel | Turret, Alarmbot, Nanoswarm, Lockdown | Excels at holding sites alone, gathering information, and delaying pushes; ultimate can clear areas or hold teams. |
| Cypher | Sentinel | Trapwire, Spycam, Cyber Cage, Neural Theft | Flashes are effective in narrow openings; scouting ability for attacks; ultimate provides crucial enemy locations; can heal teammates. |
Attacking on Haven
Attacking on Haven is a chess match. With three sites to choose from, attackers have more options- and more ways to outmanoeuvre defenders. However, without a good strategy, attacking most of the time fails on Haven. Here are some of the strategies you can use, and with a few combinations, you might win 12-0 on the attacking side.
1. Control Mid and Garage
Take Mid Courtyard and Garage early to force defenders to spread thin. This opens up split pushes and keeps defenders guessing.
2. Use a Lurker
Send one player to hold or flank the opposite site. This catches rotating defenders and creates pressure across the map.
3. Fake Outs and Split Pushes
Use smokes, flashes, or noise to sell a fake on one site, then quickly rotate and hit another. Defenders can’t cover everything at once.
4. Fast Executes
If you spot a weakly defended site, don’t hesitate to group up and hit it hard before defenders can rotate.
5. Wait Outs
Pick a site you want to attack, but wait for 20-30 seconds out of the enemy’s view, then start commencing the attack.
6. Coordinate Utility
Smokes, flashes, and recon abilities are your best tools for clearing angles and blocking sightlines.
Attacking Site A
Cracking open A Site is all about timing and teamwork. The classic approach is to split your team between A Long and A Short/Sewer, pinching defenders from both sides. Use a Controller’s smokes to block A Heaven and A Link, cutting off defender vision and rotations. Flash or drone into Heaven to clear any Operator or rifle holding the angle.
- Smoke Heaven and A Link.
- Push from Long and Short at the same time.
- Use Flash to enter the site always.
- Check the Hell and corners for hiding defenders.
- Secure A Lobby early and grab the ultimate orb at A Long if safe.
- Plant Default and set up crossfires from A Short and A Long.
- Sova, Killjoy, and Brimstone lineups will guarantee the win, but be careful about the flank.
Attacking Site B
B Site is all about speed and surprise. Because it’s so central, defenders can rotate in fast-so your execute needs to be quick and coordinated. Smokes on A Link and C Link will isolate B and buy you precious seconds. Sage’s wall can block off one link, making post-plant holds easier.
- Clear close corners with utility (Raze Paint Shells, Breach Aftershock, Sova Shock Dart).
- Plant fast, then fall back to Mid Window or B Lobby for post-plant.
- Coordinate a split push by sending some players through Mid and others from B Main.
- Don’t linger on site after the plant-B is tough to hold against a coordinated retake. So always make sure to plant for the window.
- Don’t forget to watch for flanks from both sides. You’re prone to getting hit from the A and C flanks. A good Cypher or Killjoy setup can help you against them.
Attacking Site C
Taking C is all about controlling both C Long and Garage. Pushing only from C Long is predictable and easy to shut down. Instead, split your team- send some through Garage to C Window or C Site, while others push up C Long.
- Smoke the Garage Window and CT Spawn to block defender vision.
- Flash or clear the Garage before pushing in.
- Flash Platform and back site to make sure that’s enemy behind the enemy is vulnerable.
- Push on to the site from both angles to overwhelm defenders.
- After the plant, fall back to C Long for post-plant control, using long-range weapons and utility to delay retakes in the last 15-20 seconds.
Defending on Haven
Defending three sites isn’t easy, but with smart positioning and quick comms, you can hold the line. The key? Flexibility and information.
1. Defaults
Make sure that there are two players on A, 1 Mid, 1 Garage, and 1 C spread out. This way you will have a good time to respond to the attack strategy from the enemy players.
2. Defend Mid
Use the sentinels utility well to delay the site entries, especially in the B site and Garage, otherwise, they might sneak up on you and do more damage.
3. Retakes
If you cannot hold the site, especially on B, where only 1 player is at, make sure you fall back and regroup with the team for the retake. Saving utility for the retake will be an added advantage.
Defending Site A
A is all about early info and delaying pushes. Post a defender in A Heaven for oversight, with Sentinel utility (Killjoy Alarmbot, Cypher Trap) on A Short or A Long. Use an Operator or strong rifle to contest A Long early, then fall back if pressured.
- Position traps inside the site and play on Haven.
- Use smokes or slows on A Long to stall rushes.
- Rotate quickly through A Link if needed.
- If overwhelmed, fallback, then play Retake from Heaven and A Link.
Defending Site B
B is a tough site to anchor solo. Usually, a Sentinel or utility-heavy agent holds B for info, while others are ready to rotate in from A or C. Use Cypher cages, Killjoy turret, or Sage slows to stall a rush, then fall back and play for the retake.
- Play safe for info, not for kills.
- Spam through the smoke if attackers plant.
- Retake with teammates from both links and Windows.
- Don’t overcommit alone; fallback and play for the retake.
- Have someone do a late flank from A or C, or maybe even from Garage.
Defending Site C
C is all about controlling Long and Garage. Anchor with a Sentinel or Operator on C Long, with another player watching Garage or C Window. Use traps and utility to gather info and slow pushes.
- Hold C Long early, then fall back to the site.
- Use the utility in the Garage to deter fast pushes.
- If you lose Garage, play retake from Platform/Back Site.
- Occasionally push C Long or Garage for info, but do it with backup.
Valorant Esports Player Insights on Haven
TenZ delivered a game-changing insight during his 2024 Twitch stream, “Controlling Mid Courtyard is everything on Haven. If you lose Mid, the map opens up for split executes.” This truth hits hard because Haven’s three-site layout already forces defenders to spread thin.
When attackers claim mid control, they gain the power to execute devastating splits that can crush even well-coordinated defensive setups. Mid control transforms from an advantage into a necessity on Haven.
FNS shared tactical wisdom in his 2023 YouTube series that separates skilled players from average ones: “When you’re clearing angles, always back wall peek. Standing out in the open invites free kills.” Haven’s long sightlines and elevated positions punish sloppy positioning without mercy.
FNS learned this through countless scrimmages where one bad peek could cost entire rounds. His focus on disciplined utility usage, “breach flashes, Sova shocks, or Killjoy’s Nanoswarms can make or break your execute,” shows how Haven demands precision over blindly rushing to the site.
Boaster revealed the most cunning insight in his 2024 interview, “Fake a site with noise, utility, and slow pushes. Make defenders over-rotate, then hit the other site when they’re out of position.” This psychological approach turns Haven’s complexity from a burden into a weapon.
The map’s three sites create natural paranoia among defenders who constantly guess where the real threat lies. Boaster’s strategy exploits this uncertainty, turning Haven’s uncertainty into a calculated advantage that has won Team Liquid countless rounds.
Conclusion
Haven is a map that rewards brains as much as aim. With its three-site layout and endless tactical options, there’s always something new to learn and master. Focus on map control, use your utility wisely, and communicate with your team. Whether you’re anchoring C, splitting A, or clutching a post-plant on B, these tips will help you turn chaos into victory. Now get out there and show Haven who’s boss!