
VALORANT is a highly competitive tactical shooter that requires optimal performance for the best gaming experience. Sometimes, you might face issues like lag spikes, connection errors, or the game not launching properly.
In such cases, clearing the cache can be a simple yet effective solution apart from trying to restart the game or the device. This guide will walk you through clearing your VALORANT cache to potentially fix these annoying problems.
Why Valorant Uses Cache
VALORANT, like most modern games, stores temporary data in cache files to improve loading times and overall performance. These cache files contain information about your game settings, account details, and other configuration data.
Over time, these files can become corrupted or bloated, taking too much disk space, leading to connection errors, performance problems, or even preventing the game from launching correctly. When you experience these issues, clearing the cache can help reset these files without affecting your game installation.
Valorant Cache Folder Location
Valorant Cache is located in AppData in the Valorant folder under the Saved directory in your Windows User folder and can be accessed by typingC:\Users\[Your Username]\AppData\Local\VALORANT\ in the Windows Explorer.
Before Clearing the Cache in Valorant
Remember that clearing your cache might reset some of your in-game settings, so you’ll need to readjust them the next time you launch the game. It’s a good idea to take note of your important settings before proceeding with the cache clearing.
How to Clear Valorant Cache
Unfortunately, VALORANT doesn’t have a built-in option to clear its cache, so you have to do it manually by deleting the Saved folder in the AppData folder in your Windows User location.
- Navigate to the VALORANT cache directory on your PC by going to:
C:\Users\[Your Username]\AppData\Local\VALORANT\Saved - Select all files within the Saved folder
- Delete all the selected files
- Restart your computer to ensure all changes take effect
Clearing Valorant Cache is Not Enough

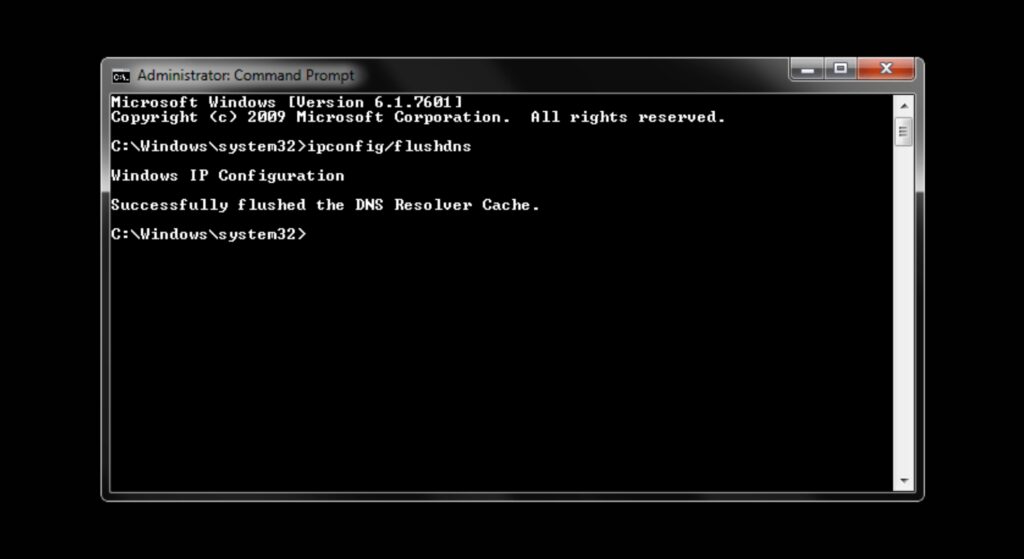
Sometimes, clearing the VALORANT cache alone won’t resolve your issues, especially if you’re experiencing persistent connection problems. In such cases, you might need to flush your DNS cache as well:
- Press the Windows key and type “CMD” in the search bar
- Right-click on Command Prompt and select “Run as Administrator.”
- In the Command Prompt window, type the following commands one by one, pressing Enter after each:
ipconfig /releaseipconfig /renewipconfig /flushdnsipconfig /registerdns
- Restart your computer and launch VALORANT again
This process resets your network settings and clears the DNS cache, which can help resolve connection-related issues affecting your VALORANT experience.
Is Valorant Cache Clean Needed Often?
No, you don’t need to clear your VALORANT cache regularly. You should only consider clearing the cache when encountering issues like connection errors, the Riot Client not opening properly, or VALORANT-specific errors such as VAN 68.
Regular cache clearing isn’t necessary for normal gameplay and might actually increase loading times temporarily as the game needs to rebuild its cache files.
Does Valorant Cache Affect FPS in Game?
No, Valorant cache keeps the data such as your in-game settings, profile data and such. Hence deleting Valorant game cache won’t affect your FPS but it might make the game much smoother. What affects FPS is the shader cache of your GPU which you can also remove using GPU control panels such as Nvidia Control Panel which will improve your in-game FPS.
Clear Valorant Shader Cache
Shader cache is pre-compiled GPU shaders or simply put the GPU settings you currently use which gives a performance boost to your game. However, it can sometimes cause issues like shutter due to conflicts in settings and cache leading to drops in FPS. You can adjust the size reserved for the Shader cache from GPU control panel and it will improve FPS in Valorant.
- NVIDIA: In the NVIDIA Control Panel (Manage 3D Settings), set “Shader Cache Size” to 5GB, or even “Unlimited,” as the default (around 256MB) is often too small for consistent performance.
- AMD: In AMD Software, find the graphics settings to enable and potentially adjust the shader cache size.
Conclusion
Clearing your VALORANT cache is a simple troubleshooting step that can help resolve various performance and connection issues. You can clear the cache in Valorant by just deleting the Saved folder in AppData/Valorant in the Windows User folder.
While it’s not something you need to do regularly, knowing how to clear both the game cache and DNS cache can save you a lot of frustration when problems arise. Remember that this process might reset some of your game settings, so be prepared to reconfigure them after clearing the cache.